Saturday, August 27, 2016

Some Robot Things

Hello People! We have not fallen off the face of the Earth.

It's been a while since we had a good old fashioned post and I feel that it is unfair to all of you to keep you in the dark. In this post I hope to cover a few points that concern our future as well as the robot activities that have been going on.

1. Brandon is going to College

Yay Brandon (that's me)! Moving up in the world and becoming my own man! Unfortunately, that means boo for the robots. Because I will be spending all my time at the University of Maryland, College Park, I will have next to no time to come home and do the robot building. Add in the factor of also trying to hold down a job/submit scholarships to pay for said college and that equals little to no resources being poured into the robots for long periods of time. As a result of this, the hallowed Columbia Mall where Bot Blast is being held this year will not include us ;_; Additionally, even the Franklin Institute event annually hosted by NERC is in possible jeopardy depending on the school schedule. However, there is a trade-off to this potential hiatus: knowledge and greater resources. not only will I be learning about all the technical stuff that Charles and Jamison and Pete and a whole bunch of more senior builders know. Additionally, I will gain access to cool machines such as a lathe or mill which allows the creation of uber-devious machines in the future.

2. Robots are still going to be a thing

Despite the above messages of gloom and doom, building combat robots is a passion of mine and will continue to be a thing. Even now, there are a few designs that I am working on that I haven't even explicitly expressed ;) While there may be periods of time where myself (or the team) may be busy and unable to attend events there will always be a commitment to continue the sport. In a more practical way, I already decided that the best way to deal with this is to build up the robot fleet while I have freetime, i.e. the summer! So now almost everyday I journey out to the machines and work on them. And now onto the fun 3rd point!

3. Robot Stuffs!

Alright so now with all the more serious matter covered, onto the more fun stuff!

El Destructo

This is the beginning stages of the current rebuild of El Destructo. As seen, the baseplate is polycarbonate/lexan which can be purchased from any Lowes in the area (reminder that we work on a budget) and attached it to the same old pieces of El Destructo that were with it back in 2010. In many ways, there isn't much changed beyond merely re-assembling it. 
In this picture you can see the basic points of the design i.e. the motors in place. From this point on assembly went by breezingly. So breezingly that I actually forgot to picture so soorryy. But essentially, this goes along as most robot builds go with the electronic wiring, cutting of material etc.
This is about where it ended up at. The electronics are all wired up and its working fine. Only trouble here is that the frame rails were a little uneven meaning that the traction is a little difficult. After trimming the bottom of it for awhile I got it to a good balance. Before it competes again I hope to get a thin layer of rubber of it on to get muuuuxxiimmummmm trraaccttiioonn. But for now it is just sitting because of the focus on the main competitor....
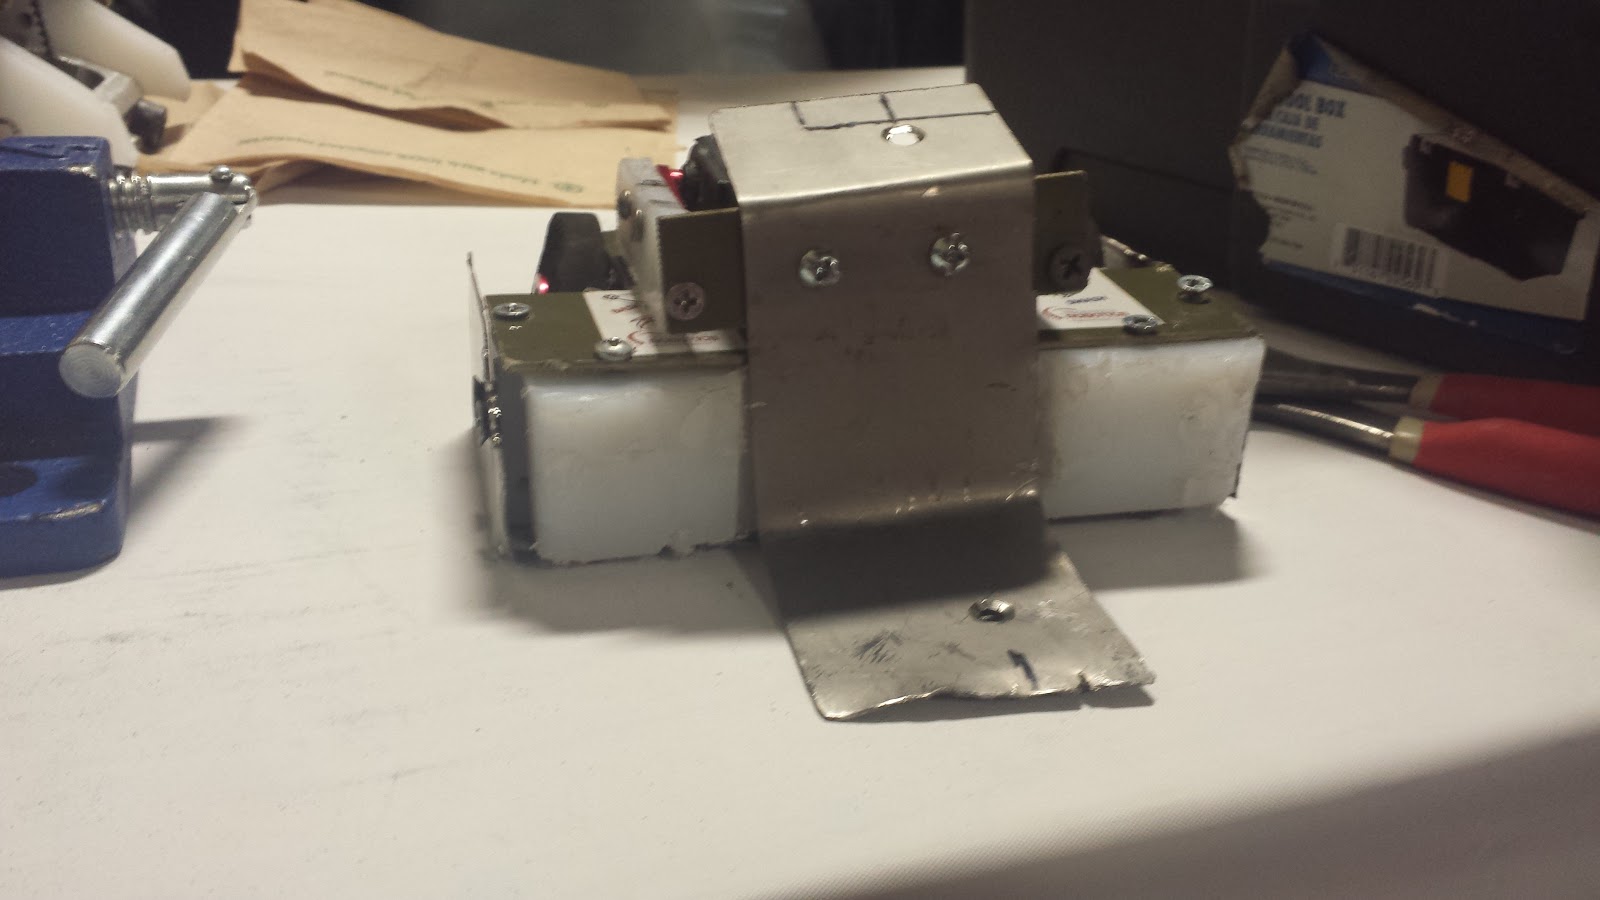
Yes! I mean wait not this but also this exactly! You see Russ Barrow, long-time veteran/ contributor on the Combat Robotics Facebook page (place where all the cool kids chill at)/ Admiral of the Dark Forces, created a handy dandy solution where the 1000RPM gearboxes sold through Kitbots and on eBay is paired with a brushless motor creating a amaaaazzingly powerful drive system at only a fraction of the weight of having to use 4 drive motors for comparable output. According to the specs, each of these motors can produce up to 89W of power 

Here are the beauties installed into the chassis of WoD v3. One of the troubles that plagued WoD v3 at Motorama was that the drive train wasn't nearly strong enough to push both itself and another robot (at least not quickly) which resulted in rather lack luster performance. Comparatively, that creates the equivalent of jet engines on a Fiat 500.


WoD v3 as it sat before testing. At this point, the idea of having hard-mounted front wedges was abandoned and instead another cross member was added. This essentially turned WoD into a brick with only hinge wedges on the front. That piece of aluminum on the top is connected to the lifting servo which got re-oriented to flip better. In the first setup of WoD v3 the servo was connected by linkages to a floating lifting arm much like the original WoD: Wedge of Doom (not Destruction). Instead, the servo is directly mounted to a right angle bit of aluminum similar to that of Revenge of Dr. Super Brain 


So here's the video of it testing


And my reaction about it immediately after finishing it


After confirming that the drivetrain works well, I proceeded to work more on that lifter I mentioned before. That piece above is Grade 5 .063" Titanium. I used a propane torch from Lowes to slow heat it.
 The recipe to bend titanium is pretty simple: just heat up the Titanium until it is about cherry red and then bend to appropriate position then quench in water.


And voila you bent the lifting face to shape. After I punched a few holes in the top of it I connected to that aluminum plate. Those little bits of Ti are designed to hold the robot down and not allow it to faceplant that hard. If these weren't there, the robot would roll onto its face and invert itself because the lifter acts as a fulcrum. Those prongs serve as a way to shift the fulcrum more onto WoD v3 which allows it to flip the other robot up.


And I added preettyyy liighhtsss. Besides looking hecka dope in a dark room, they are also a very clear indicators to tell if the robot is on or not. To connect this to the power, I wired it directly into a plug into the receiver. As a result, if WoD is damaged in battle or at least knocked the hipple out I can see the state of the receiver. If the receiver/ lights are not reacting at all then I can clearly see it and then mourn appropriately. 


Dope pic with the UHMW glowing and the emperor's hat. Originally, that piece was designed to be on the original WoD v3 iteration then was put away once I realized it needed to stick out waaaay more to be useful. Now its on WoD's head to be a crown technical reasons like self-righting. This extension allows the lifting arm to extend far enough to allow the wheels to touch the ground and pull it back right-side-up. Unfortunately, it also allows it to faceplant but that will never happen in combat happen anyway and will be filmed most likely by Other Brandon. But enough of that! On to the reaaaalllyyy interesting stuff.

Flywheel Flipper Thingy

Man has been vexed by a struggle for many a time of one question.....how to flip a robot using circular motion? This question has been one of immense interest in the robot combat community. People such as Team Whyachi, The Didactic Dale Heatherington, and Charles-Senpai have created solutions, but I thought to myself why not and threw my hat into the ring.


This is a really simple sketch I made for my submission into the flywheel flipper frenzy. This design is remarkably (perhaps way too) simple. Basically, think of it as one of those old carnival games that tests your strength. The whole mechanism is essentially a lever that utilizes the kinetic energy of a hammer in motion to move a piece of metal on the end and launch it upwards. A lever is a simple machine so there is very little loss in that transfer (assuming the parts don't just shatter from the energy in the impact). The springs in the front are holding the lever away from the beater drum allowing it to achieve high rpms. The only way this engages is by the robot driving head-first into the opponent at high speed. At ramming speed, the resistance of the springs will be overcome by the inertia of opposing robot pushing against the flat face of the lever. This speedy entry (heh) will force the lever (hopefully) into the beater bar quick enough to allow the beater to "bite" the same way it would against an opponent robot and therefore transfer the energy into the lever. After the object (i.e. other robot) is removed from the lever by forced flight the springs will naturally pull the lever from the beater and reset. Sounds good in theory right? 

Well, Charles-Senpai and the greater community had points about this design as seen in this quick blurb: 

Very important points put up here that I will have to address for this to work. A some of them tried to be covered here:
  1. The "bite" will be attained by the speed of the robot. I intend to use the aforementioned brushless drive motors that will give the robot a insane top speed. While I do not have the exact speed to tell you the force, I can guess that with 2" wheels on 3s 11.1V Lipo it will be very fast. 
  2. The design of the lever is with the use of socket head screws. These screws are specially treated to be able to handle harsh impacts and are made of much tougher stuff than say the Aluminum or UHMW around it. Hopefully this will result in some better stuff....


A little more flushing out of the design. In this the drum is only 2in in diameter.


In this design the lever shape has already changed and the inclusion of a Weta beater bar is used. Since it is not only a quality but is also readily available (i.e. gifted from PK) it was simple just to drop it in. 


Little more experimenting with lever solutions 


It was at this point that I then said screw it and just threw something together from scrap parts using approximations from the CAD-ing


After a little more buildup and detail it got to here. During testing,


The final activity undertaken before I left for college was to harden CATAPULT's shell. It was a very simple setup: Just focus propane torch on to spot (in this case teeth) until it turned a certain color/temperature (in this case cherry red), quench in water (don't remove until all hissing sounds have stopped), then heat up a little more then let air cool. 


In the sunlight it doesn't look very red but with the garage closed....


It’s QUITE bright. This whole process went down on all the teeth. At least now the next time CATAPULT would have to fight a robot like Chibi Blackout at least the teeth won't be destroyed :/


That's about everything for now! College should be starting in about two days after this post is published and as a freshman living in a dorm I won't be able to do robot stuff since classes are here and the tools are somewhere else. Ciao!

Tuesday, April 5, 2016

Motorama to Now-ish: During and After the Event

Alright, so lots to cover

First, Motorama
So this is the Bone Dead Robotics squad rolling up into Motorama. The shell in the back their is the chassis of CATAPULT (6lb Mantisweight) that never competed, but I always bring for the coolness factor of being a full shell made by the greatest machine shop everr. The usual suspects, PK v2, WoD v3, and Ferocious Mk. IV are all in the middle before any carnage has befallen it yet. I also brought the chassis of the original Weta clone PK came from. I originally wasn't going to bring it until I got.....a premonition...about it that said I would need it for......reasons....

The competition began with the Antweight tournament. Ferocious faced Puppy which was a member of the Collective family but wanted a solo career (like a certain Mayn Zalik). As the video shows, both robots were incredibly speedy, but the low lip and lifter secured the W. 

With our luck of course, this meant bad things were to happen.

As a result, Ferocious faced off against the super-dominant-ultra-strong-king-of-the-insect-bots Vile Ant. But instead of getting trashed.......


THIS. THE THING HAPPENED GUYS. THE THING.


Yep, in one of the luckiest shots I have ever seen, Vile Ant chucked Ferocious into the one place in the box that it really couldn't recover from: the gap on the side of the arena with the giant bill of the lifter literally all the way through it thus creating a complete and inescapable face plant. Murphy's Law wins again.

Here is Vile Ant getting removed from the box after posing with the newly faceplanted Ferocious. After this, Ferocious fought against Poco Tambor who is one of the most solid and formidable competitors today. Another oh-so-lucky draw I know.

The fight was pretty close at first, but gradually the drum caught the edge of the lifter and made it impossible to get under so in the end it was just a matter of seeing whether or not it would break. Overall, no damage to the chassis was given. A few chips in the front UHMW was all that there was. Unfortunately, the lifting servo was messed up a little bit, but this didn't become apparent until after it got hit by Klazo of Near Chaos Robotics/Chaos Corp (the drum). Ultimately, I love this little guy because its base is incredibly rugged and the weapon is pretty solid. I don't see much change necessary for it besides cleaning up the edge of the lifter. 


Oh look, bigger me! This is Revenge of Dr. Super Brain who is a 3lb lifter. As it can be seen, these two bots are basically the same only adjusted to weight class. Super Brain is older though so he gets the "originality points." Anyway, on to the main competition!


Here's a pretty picture courtesy of Pete Smith of Kitbots allowing us to use little studio he brought with him to record robots at the event.


Another pretty one!


A-not-as-pretty-as-before-but-could-be-worse one!

WoD v3 was the first one up, against Mombot (seen below)

I knew that I was immediately disadvantaged because the style of this robot is too high. LOOK AT THOSE HEARTS AND BUTTERFLIES, In all seriousness though, this robot is very sturdy. It is made of a UHMW unibody with about .5in protection at each portion and a .063in Grade 5 Titanium wedge. It's pretty indestructible. However, the main problem emerged from speed. You see, WoD was the test mule for the fusion gearmotor between the Kitbots 1000RPM gearmotor and the Banebots RF-370 motor (which may or may not be out of stock). The reason for this is that the original motors that come with the 1000RPMs are considerably less durable than the Banebots so it improved reliability. Additionally, the Banebots run on a nominal 7.2V which means that when overvolted at 14.8V (4s Lipo) it will spin at high speed. Note: When overvolting motors make sure that it is properly cooled otherwise it will burn up, demagnetize or some other catastrophic event. Moving on, WoD v3 lost its first match due to two main problems:
  • The lifting arm's face was too floppy

The other front two sets of screws were unfortunately ruined as a result of the tap breaking off in one and the other not being completely bored through.as a result, the top screws ended up serving as pivot points since they were the only point of contact between each arm and the front face. 
  • The pinion on the shaft of the BB 370 moved while it was operating

While constructing the combination I decided to use high-strength Red Loctite to secure the shaft to the pinion. However, I discovered at Moto that this isn't good for the "sleeve" type bond that is in play. While the red holds it tight as possible, there is still a large enough gap between the shaft and pinion which means that it doesn't have those tight friction forces which provide most of the force to keep it in place. As a result, the continued trauma in the spinning directions (i.e. going forward and backward) the red was forced to burden more than it should so it snapped. Upon additional research, I discovered that the Loctite 640 "Green" compound is designed for sleeve relationships and, once applied, makes everything all good again :)

Unfortunately, this knowledge didn't help me at the moment since I still had no way to help it. So, I threw some classic 1000RPMs into it and prepared to fight Scrambles the Death Dealer.

A little moment for Scrambles.

Scrambles has been a de facto eternal rival for BDR as it has competed against both Play'n Krazy v.1 and El Destructo. In all cases, it has been a frenemy relationship where we both just want the beat the crap out of each other.

Back to the fight! WoD could only really just drive around. Being a pulley-driven 4WD robot it meant that it basically only has the power of a 2WD robot but with more stability (longer wheelbase) and drag (more tires to move). As such, without any super powerful drive motors it becomes a weak pushy bot whose job was to bear the carnage. Which is exactly what happened until Scrambles managed to reach under the wedge and lightly slap the receiver which turned it off. As a result, WoD was out of the tournament but the all 5/16" 7075 Aluminum chassis with .06" Grade 5 Titanium held up fine. The base chassis is super strong and completely undamaged so I'm going to build off of that later.

Now for PK!

Well, PK got wrekt. Like SUPer wrekt.

Like


That wrekt. 

  • Ripped the left nutrstip out of the UHMW sides
  • Bent the thin lip of the Grade 5 .063" Ti wedge
  • Bent the aluminum baseplate hard
  • And shattered the receiver case
Good Lord it was wrekt despite all my hopes and dreams :'(

But remember how I mentioned that auspicious feeling of bringing the old chassis? Well looks like someone upstairs was looking out because now I had a pre-designed and guaranteed combat-survivable chassis! With the support of Frederick Moore,who had BEST KOREA and Gracious Pipefessionalism, having great sportmanship in giving me a new weapon ESC (the other smoked out after its wires got crossed or something during impact) I was able to rebuild the whole thing in less than 20mins. 


Despite my best efforts, the Weta design never failed to return anyway. My hat is off to you Pete Smith! Anyways, the fight went well until the Afro kinda went crazy and disabled my control probably as a result of the receiver being browned out by it or something. The left drive motor had one of its ESC wires broke and the right had the motor completely separate from the gearbox which left it dead in the water. All in all, back to the drawing board for PK! Now its time to resurrect El Destructo...


Sunday, January 31, 2016

Path to Motorama 2K16: Wedge of Destruction v3

Well this post is going to be a UBER long post dedicated to this little bucket of sunshine: Wedge of Destruction v3.

First, a little backstory

Like many other builders here I grew up watching Battlebots/ Robot Wars and was like yaaaaas that is too cool. One robot I loved to watch was (in a Mark Beiro voice) Weeeedge oooof Dooooooooomm.
That robot was one of the coolest customers I saw because of its simplicity, effectivity, and coolness. That low profile shape made it hard to hit and gave it the appearance of a some kind of shark, you know like a Mako or something, which it then embodied by its speed and aggressive attacks. Its lifting arm was such a simple design yet its impact in battle was evident as it LIFTED AN ENTIRE OTHER ROBOT OF THE GROUND!!21! (that was 5 yr old me getting hyped for a sec). Naturally, I sort of had this image in the back of my mind of this guy which just kinda lingered there for years.

Another robot that interested me was this guy: Gammaaaa Raptoooor
Gamma Raptor here bore many similarities to Wedge of Doom in the fact that they are both really speedy lifter lightweights. So you can imagine how hyped I got when I saw this fight. 

Their respective designs were both very similar to each other, but they had differences that I liked about one versus the other. Wedge of Doom had a greater range of lift-a-bility than Gamma Raptor due to it having a 180 degree arc shape versus the 4-bar lifter of Gamma Raptor which had a smaller range of motion. However, Gamma Raptor's shape was much tighter and the close proximity of the wheels to one another made turning great. Additionally, the wheels poking out so cleanly allows it self-right even when it is stuck.

I loved them both tho so like the commercial says  I just fused them. Note: there were two other versions of WoD preceding this one (hence the v3) but I'll probably just put that in a Servo article :P

Now, onto the build!

So in this blurry phone picture we make out that the first of the frame rails has at least been cut out. 

In this not so blurry pic we see that this robot has integrated notches built into it. The goal of these notches (besides looking legit) is to strengthen the front wedges. When the front wedges have notches cut into them, they will overlap each other much like a jigsaw puzzle. By overlapping this way, a large portion of the energy from a weapon shot will be transmitted away from the screws and into the 5/16" 7075 Aluminum which is considerably stronger and will therefore absorb the energy better.

At this point, I had begun to cut the blank 1/8" holes into the top of the frame rails in order to prepare to tap them for 6-32 screws to attach the top and bottom plates.  

I done goofed up that one. That was most of the tap breaking off in the hole because I sneezed as I was removing it (sigh). As a result, I had to make another hole directly behind it. The other whole is fine, but now I'm down like half of the tap.

Here is the fix happening in the drill press.

First screw in!

So here is the first part of a pretendo-bot frame. This is basically just the cross brace and the left frame rails shoved together. That interlocking bit took some time, but it is a fairly tight fit which is good so as much energy as possible is translated


 More pretendo-bot pictures!

A look inside of the chassis (note the motors and wheel attached). Now those motors are a little different than average 1000RPM Motors because they are mated to Banebots 370 sized motors. They are considerably faster than the usual motors and they all have metal back which makes it less easy to ruin by heating it too long. On 3s they are already blistering so with a 4s it should be lightning quick. For a non-high KE robot, a speedy drivetrain is super important as it allows it to still be entertaining as well as more maneuverable. 

Still on weight!

Better pretendo-bot with the top/bottom plates on 

 Here is the first dead shaft for the front pulleys. It is a 1/4" spacer which is counter-sunken into the frame rails which provides extra rigidity and strength.

Example of the counter-sunken holes in the frame rail

Even more pretendo-pretendo bot

Getting ready to battle some .06" Grade 5 Titanium with some fancy McMaster cut-off wheels thanks to Charles Guan

Well, they came out looking nice, but I messed up the left one by leaving it a liiitle too short. Welp, guess you measure twice then cut once..

So this is a side flap and was planning on bending it down to cut the sides. I even cut a little groove along the bend to make it easier. Unfortunately, I forgot that titanium (with the exception of really thin material) needs heat to bend...

....so I ended up just breaking it off and smoothing it off.

Here is an example of the "notch method" from earlier. A vertical or horizontal shot to the wedge is transferred to the frame rail and vice versa. This should help keep it strong against those meenies.

Not bad, right? Kinda? Okay I admit that they aren't perrrrfect but considering 90% of this was hand tools it was pretty good.

Fingertech Robotics belts and Tiny Switch!

The belts are on! Its almost-not-quite-okay-not robot fighting time!

From da rear. From here the motors are clearly seen. 

Some early wiring done to the drive ESCs and motors. Those black drive ESCs are Vextroller 29s which can be hacked  and then used for drive. However, they don't have an internal Battery Eliminator Circuit (BEC) which powers the receiver and power the servo (which comes from the receiver). In this case I'm using a Castle BEC

Yay its still on weight!

I did some work on the lifter frame rails by cutting them out of some Alum and then pressing the bushings into them. They provide a very smooth lifting action and doesn't lose much energy to lift. 

Rewired with the switch and servo mounted. That servo is a Savox 1231SG servo which has more than enough power to lift a 3lber up all the way off the ground.

Closer to completion. Note: That wrench is not a weapon but instead turns the robot on and off.

Tiiii wings! They were designed to both strengthen the outer frame rails against horizontal hits as well as keep it from getting stuck on its side. Unfortunately, they ended up messing with the drive as they messed up the belt's tension and therefore would ruin drive. Also in the picture is rear mounting blocks for the lifter. Nothing special; just two blocks of aluminum with a spacer in between.

The arm linkage is in place! Too bad the arms don't mesh perfectly..

Solution? offset the screws so the arm still remains level!

Here are some spacers I attempted to use as tensioners, but they ended up having the same effect as the tii wings strangely enough. Oh well, just gonna have to make do with what I can.

At this point, when half the robot is apart on the floor, did I realize this miscalculation (facepalms)

The rear end is finally attached! It is made some of the 1/8" UHMW armor from the original Play'n Krazy and the Weta kits. 

And that's a wrap on WoD v3!